Abandoned Cart, Browse and Wishlist - Behavioral Triggers in Marketing Cloud
It just got a lot easier to reach customers who abandoned their cart or website visit! Salesforce introduced a new way to set up such campaigns by yourself. I’ll explain the prerequisites, the setup process, what goes on behind the scenes and why it is even interesting if you already have abandonment triggers configured the oldfashioned way.
What’s new?!
Until the July 2020 release it was necessary to involve the Predictive Intelligence team at Salesforce to set up those triggers for abandonment campaigns and make sure the data flows from the Einstein Engine back into to your account. Even if you wanted to change a setting for the trigger or add a new field to it, you needed to engage the team at Salesforce. Luckily that changed and you now have the possibility to do the entire setup and further changes yourself within the user interface.
Prerequisites
In order to make use of Behavioral Triggers, you need to have the following things - that aren’t covered in this article - configured:
- product catalog for Einstein Recommendations
(used for web and email recommendations) - collect code to track your customer’s behavior on your website/shop
(used for web and email recommendations as well as web&mobile analytics; the relevant code with details can be found in your account: go to Einstein and select “Web Recommendations” or “Email Recommendations”, hover over “Admin” and select “Implementation”)
As you might have noticed, the prerequisites are exactly the same as before the new feature has been released.
If you don’t already have those things set up, you can finde some helpful resources below:
- Catalog (Marketing Cloud Documentation - Einstein Recommendations)
- Collect Tracking Code (Marketing Cloud Documentation - Data Management and Analytics)
But now, let’s get started…
How do you set up a trigger?


The setup is fairly easy and requires just a few steps:
- Go to Journey Builder > Behavioral Triggers
- Click on “New Trigger” to start the setup wizard
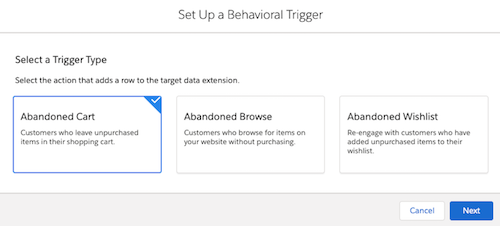
- Select the type of trigger you want to set up:
- Abandoned Cart
- Abandoned Browse
- Abandoned Wishlist
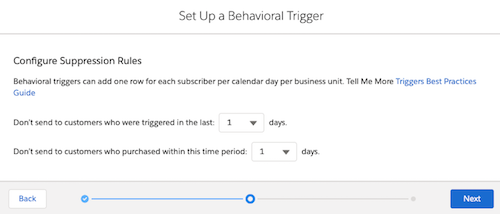
- Configure the Suppression Rules that determine when to inject a customer and when to suppress them (depending on the last time the trigger fired as well as the last puchase date)
- Review your settings and confirm
- Click on the Gear-icon and select your desired Session Timeout Limit (for the customer’s web session)
Your trigger is now set up and every eligible abandonment will be placed in an automatically created data extension. Those data extensions all start either with “abandoned_cart_”, “abandoned_browse_” or “abandoned_wishlist_” followed by an automatically generated number.
Those data extensions don’t expose too much information, as they only contain three columns:
subscriber_key(Primary Key, Text(100))timestamp(Primary Key, Date)data(Text(4000))
The subscriber_key corresponds to the value you pass to the collect code snippet inside the user_info.email property. In the data-column you’ll find a string value that is used to fetch the abandonment data, product date, etc. by the standard content block. Furthermore it can be used to retrieve data from the API yourself. It looks like the column value is encrypted, hashed or encoded data of some sort, but I still need to figure that out in detail - but for now we know what it is for and how we can use it for our purpose.
So now that the trigger is set up and data is flowing into the data extension, you want to use that data, right? So lets go ahead and create an abandonment journey…
Creating an abandonment journey and email

As the data is coming into a data extension, you need to create a journey utilizing a Data Extension entry event. In the entry event configuration, select the automatically created data extension from the previous step and set a desired schedule to run. Next, you need to set the “Contact Evaluation” to only evaluate new records.
Having the journey run on a scheduled basis might sound strange for this kind of trigger, but the old abandonment trigger method set up by the Predictive Intelligence team was as well evaluated on a scheduled basis only. So even tough you could trigger the journey/automation via a file drop, the campaign was still de facto scheduled.
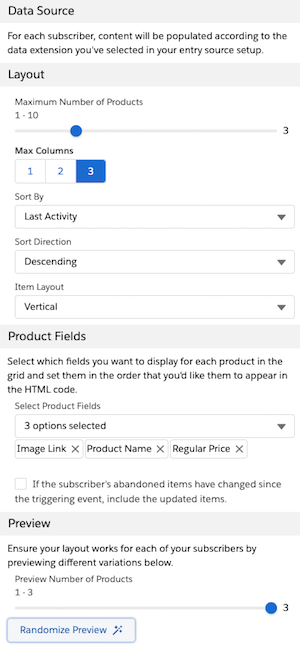
When creating emails for the campaign, you’ll want to include the items from the cart, the ones your customer viewed or added to the wishlist - depending on the trigger you are using. Doing so without coding is very easy, as there is a specific content block called “Behavioral Triggers” for that. As long as your send’s or journey’s data extension is the data extension of a trigger, the products automatically populate. To make sure it suits your needs, it is possible to customize quite a few parameters:
- the maximum number of items to display
- the columns to display them in
- product sort
- layout
- which product attributes are shown
- version of cart contents to display (trigger time vs. current)
If you need further inspiration and best practices to plan a successful abandonment campaign, check out Salesforce’s Guide: “Abandoned Cart Emails: Your Best Tips, Tricks, and Examples”.
Behind the scenes
Do you feel the urge to dig in deeper and find out what’s going on behind the scenes? If so, that’s exactly what I felt when I tried that feature out. If you don’t feel that way, but the standard content block doesn’t work out for you, you should continue reading as well! However, if that doesn’t bother you at all, skip this section and jump to the conclusions.
I looked into the code that is created by the “Behavioral Trigger” content block and noticed that there is a HTTP-POST-Request to the igodigital-API, that retrieves information based on the data-column of your data extension. This means that you can build your own custom content based on the trigger’s information, even though you don’t have the necessary fields available in the trigger’s data extension.
To get the endpoint address, you just need to know the MID of the Business Unit you are working with - which can be found in the Account Name dropdown, as well as in the Collect Code implementation on your website or on the “Implementation” page in Marketing Cloud, that I mentioned in the prerequisites section. Having that information, you can get the endpoint by replacing the placeholder with your MID:
https://[MID].recs.igodigital.com/[MID]/triggerThe payload sent to that endpoint is of type “application/json” and contains the value of the data-column in the trigger_payload-property:
{
  "trigger_payload": "[the string from the data-column of your trigger's data extension row]"
}
As a response to this API-call you’ll get a lot of interesting information like:
- products in the cart at time of the trigger
- products currently in the cart
- information whether the cart changed or not
- did your subscriber purchase in the meantime
- code for a tracking pixel
- …
But even better, you can control the returned data by using the following URL-parameters:
item_count(maximum number of items to return)include(pipe separated list of product attributes from your catalog to return)sort_by(how the items should be sorted (e.g. item_order))sort_direction(desc or asc)locale(in case you use localized fields the data will be retrieved in the desired one)
So with those parameters in place your request URL could look like this:
https://[MID].recs.igodigital.com/[MID]/trigger?item_count=2&include=ProductType|Color&sort_by=item_order&sort_direction=asc&locale=de_atAnd that’s what a response looks like:
{
  "products": [
    {
      "link": "https://[MID].collect.igodigital.com/redirect/[some encoded string]",
      "image_link": "https://markus.codes/images/products/123.jpg",
      "product_code": "123",
      "name": "Demo Produkt",
      "regular_price": 40.00,
      "sale_price": 29.99,
      "sku_id": "123",
      "online_availability": "Y",
      "product_type": "demo",
      "color": "grün",
      "quantity": 1,
      "amount": "29.99"
    }
  ],
  "current_cart": [
    {
      "link": "https://[MID].collect.igodigital.com/redirect/[some encoded string]",
      "image_link": "https://markus.codes/images/products/123.jpg",
      "product_code": "123",
      "name": "Demo Produkt",
      "regular_price": 40.00,
      "sale_price": 29.99,
      "sku_id": "123",
      "online_availability": "Y",
      "product_type": "demo",
      "color": "grün",
      "quantity": 1,
      "amount": "29.99"
    }
  ],
  "same_products": "Y",
  "user": {},
  "purchased": false,
  "abandoned_items": "123",
  "tracking_pixel": "<img src='https://[MID].collect.igodigital.com/api/email_open?hash=[some_hash]&retailer=[MID]&scenario=[something]&email=[subscriber_key]' height='1' width='1' />"
}
Pretty neat, right? Just imagine the possibilities you have with all that data and the options you have to control the API-response!
Conclusions
The Behavioral Trigger feature allows Marketing Cloud customers to get started with cart, browse and wishlist abandonment campaigns faster than ever before. And even tough it looks like your possibilities are restricted by not having the details within the data extension, that isn’t the case as you can interact with the API and get every information you need. Furthermore, it even gives you more flexibility when it comes to adding fields and adjusting parameters like the session timeout and supression periods, because you don’t have to involve the Predictive Intelligence team anymore. Another benefit is seeing all those settings in the interface rather than having them configured somewhere in the backend where you don’t have direct access.
Now that you know everything required to get started, log in to Marketing Cloud, start building your abandonment campaigns and convert those customers!